This guide explains how issuers create and send an EviMail from Namirial Notify. EviMail is the certified email service for sending content directly to recipients' inboxes while recording the relevant delivery evidence.
Available fields can vary slightly by tenant, enabled features, and permissions. This guide describes the standard EviMail flow, organized into tabs: Content, Configuration, Advanced, and Preview.
- You are signed in as an issuer.
- You know the recipient email address.
- You have the message subject, body, and any files you want to attach.
- If you want to reuse saved recipients, your contact list is available in Contacts.
- Sign in to Namirial Notify.
- Select New EviMail in the issuer area.
- Open the EviMail form.
- Enter one or more primary recipients in
Destination. - Add optional copy recipients in
Carbon copy (CC)if needed. - Select the sender in
Email address. - Decide whether to enable
Do not send the Sender header in notification emails. - Decide whether to enable the option that changes the
Reply-Toheader in notification emails, if your process requires it. - Enter
Legal identification of the issuer (company name, identity document, full name...). - Select the
Notification language. - Enter the
Subject. - Enter the message
Content. - Add any files you want to attach.
- If you want to reuse saved recipients, open the contacts picker and select them from the contact list described in Contacts.
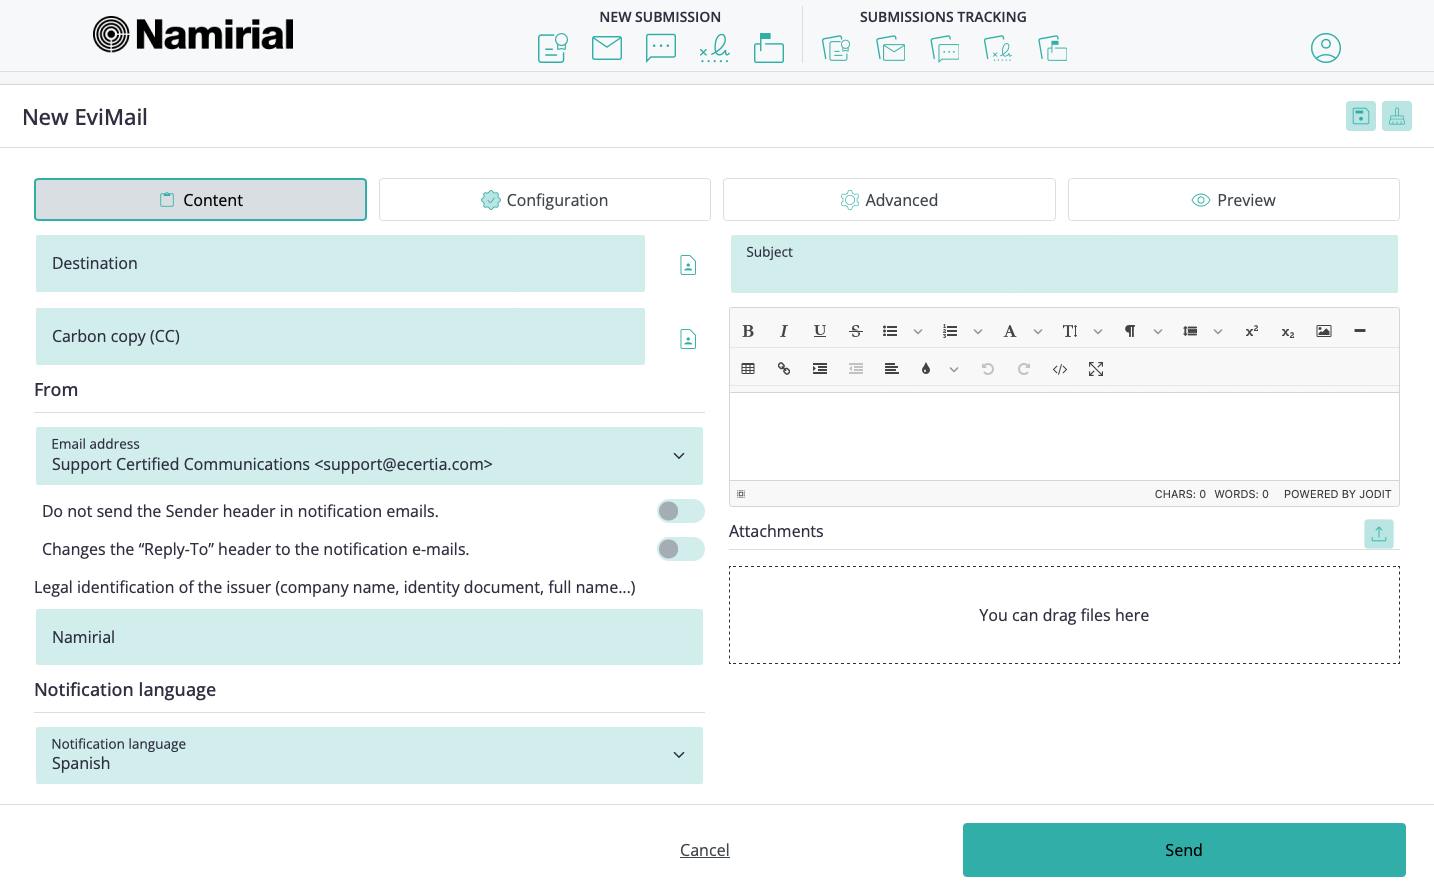
Key fields in this section:
DestinationandCarbon copy (CC)let you separate primary recipients from copy recipients.Email addressselects the sender used in notification emails.- The sender-header and
Reply-Tooptions adjust how notification email headers are built. Legal identification of the issuer (company name, identity document, full name...)defines the issuer identity shown in the workflow.Notification languagecontrols the language used in recipient-facing notifications.- The attachments area shows the file-size and message-size limits configured for your tenant.
If you enable Do not send the Sender header in notification emails, traceability can be reduced because sender data is used for status updates from recipient mail servers.
- Open the configuration section.
- Set
Tracking untilto define how long the message remains tracked. - Select the
Appearanceoption you want. - Select the
Certification and security level. - Select the
Affidavit Language. - Review the selected
Affidavits. - Configure
Agreement possibilitiesif the recipient must be able to accept or reject the content. - Decide whether to enable
Comments are allowed. - Enter
Reasons for acceptanceif your process uses them. - Enter
Reasons for rejectionif your process uses them. - Decide whether to enable
Reason for acceptance required. - Decide whether to enable
Reason for rejection required.
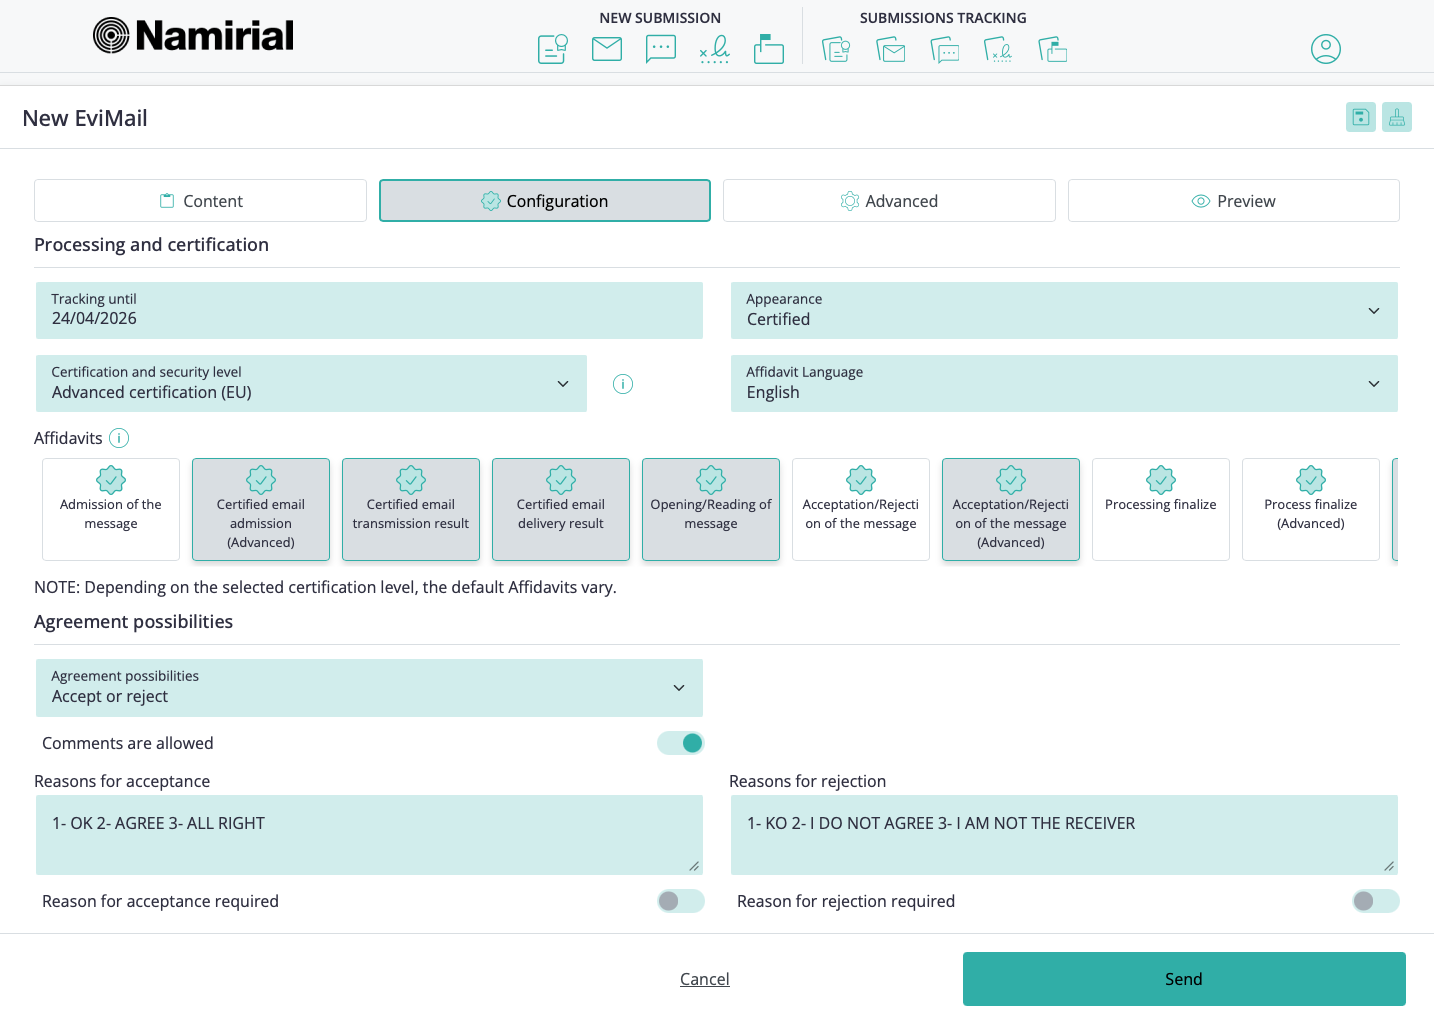
Key fields in this section:
Tracking untildefines the date when delivery attempts stop.Appearancecontrols how certification is presented in the communication.Certification and security levelandAffidavit Languageaffect how evidence is certified.Affidavitsare selected through the cards shown in the UI, and the default set can vary according to the selected certification level.Agreement possibilitiescontrols whether recipients can accept, reject, or both.- The comments and reasons fields shape the information recipients can or must provide when they respond.
For more detail on generated evidence and affidavit kinds, see Evidence and affidavits.
- Review any additional options shown in your environment.
- Select the
Custody access controlmethod if it is shown. - Set the
Retention periodif it is shown. - Enter the
Cost centerif your organization uses internal allocation codes and that field is available. - Enable
Notarial depositand select theNotary profileif this feature is available for your tenant and territory.
Key fields in this section can include:
Custody access control, when shown, defines who can access evidence by link.Retention period, when shown, determines how long the evidence remains accessible and can affect billing.Notarial depositis available only in certain territories and only when enabled for your tenant.
- Open the preview section.
- Review the recipients, sender data, subject, content, attachments, and configuration.
- Confirm that the certification and recipient-option settings are correct.
- Click Send.
Namirial Notify creates the EviMail and starts tracking it according to the selected configuration. The transaction then appears in the issuer area, where you can monitor its status and retrieve the available evidence and affidavits.
Problem: The form does not let you complete the submission.
Cause: One or more required fields may be missing, invalid, or blocked by a validation error.
Solution:
- Confirm that all required recipients have valid email addresses.
- Confirm that
SubjectandContentare complete. - Review attachments and any validation messages shown in the form.
- Check whether a required configuration option is missing.
Problem: A field or feature described in this guide does not appear in your EviMail form.
Cause: The option may depend on your tenant configuration, enabled services, territory, or user role.
Solution:
- Confirm whether the feature is enabled for your tenant or role.
- Check whether the selected service, certification level, or territory supports that option.
- Contact your administrator or sales contact if you need the option enabled.