This guide explains how issuers create and send an EviPost from the Namirial Notify Web app. EviPost sends certified physical postal communications and records the postal processing and delivery evidence supported by the selected service type and configuration.
Available fields can vary slightly by tenant, enabled features, territory, and permissions. The EviPost creation page is organized into tabs: Content, Issuer, Advanced, and Preview. Move through each tab to complete the transaction before sending.
- You are signed in as an issuer.
- You have the PDF document you want to send and the recipient and issuer details listed below.
- The destination is within Spain and is supported by the service type enabled for your account. See EviPost service types.
| Form tab | Required information |
|---|---|
| Content | Recipient name or identifying data, street address, locality, postal code, destination country, and one PDF smaller than 2 MB. Recipient region is also required for Certified delivery (Registered). |
| Issuer | Sender name or identifying data, street address, locality, region, postal code, and country. Review any values already filled in from your account. |
| Advanced | Review the selected service, certification, affidavit, and custody settings. Defaults may already be selected. Complete any required custom fields. Conditional settings are explained under Review options: challenge-based access needs a challenge and response; notarial deposit needs a notary profile; push notifications need both a URL and event filter. |
Recipient region is optional for the other service types. Organisation names, phone numbers, email addresses, and issuer comments are optional in the standard form. Provide them when needed for your postal process. Follow any additional validation messages for your account or service type.
The Web form has its own required fields; the API Submit requirements describe a different submission interface.
- Sign in to Namirial Notify.
- Select New EviPost in the issuer area.
- Open the EviPost form.
- Enter the recipient name in
Name and/or identifying data. - Enter
Organization or business namewhen applicable. - Enter the recipient
Address. - Enter the
Locality. - Enter the
Regionwhen using Certified delivery (Registered); it is optional for the other service types. - Enter the
Postal Code. - Select the destination country.
- Enter the recipient
Phoneif available. - Enter the recipient
Email addressif available. - Attach the PDF document you want to send.
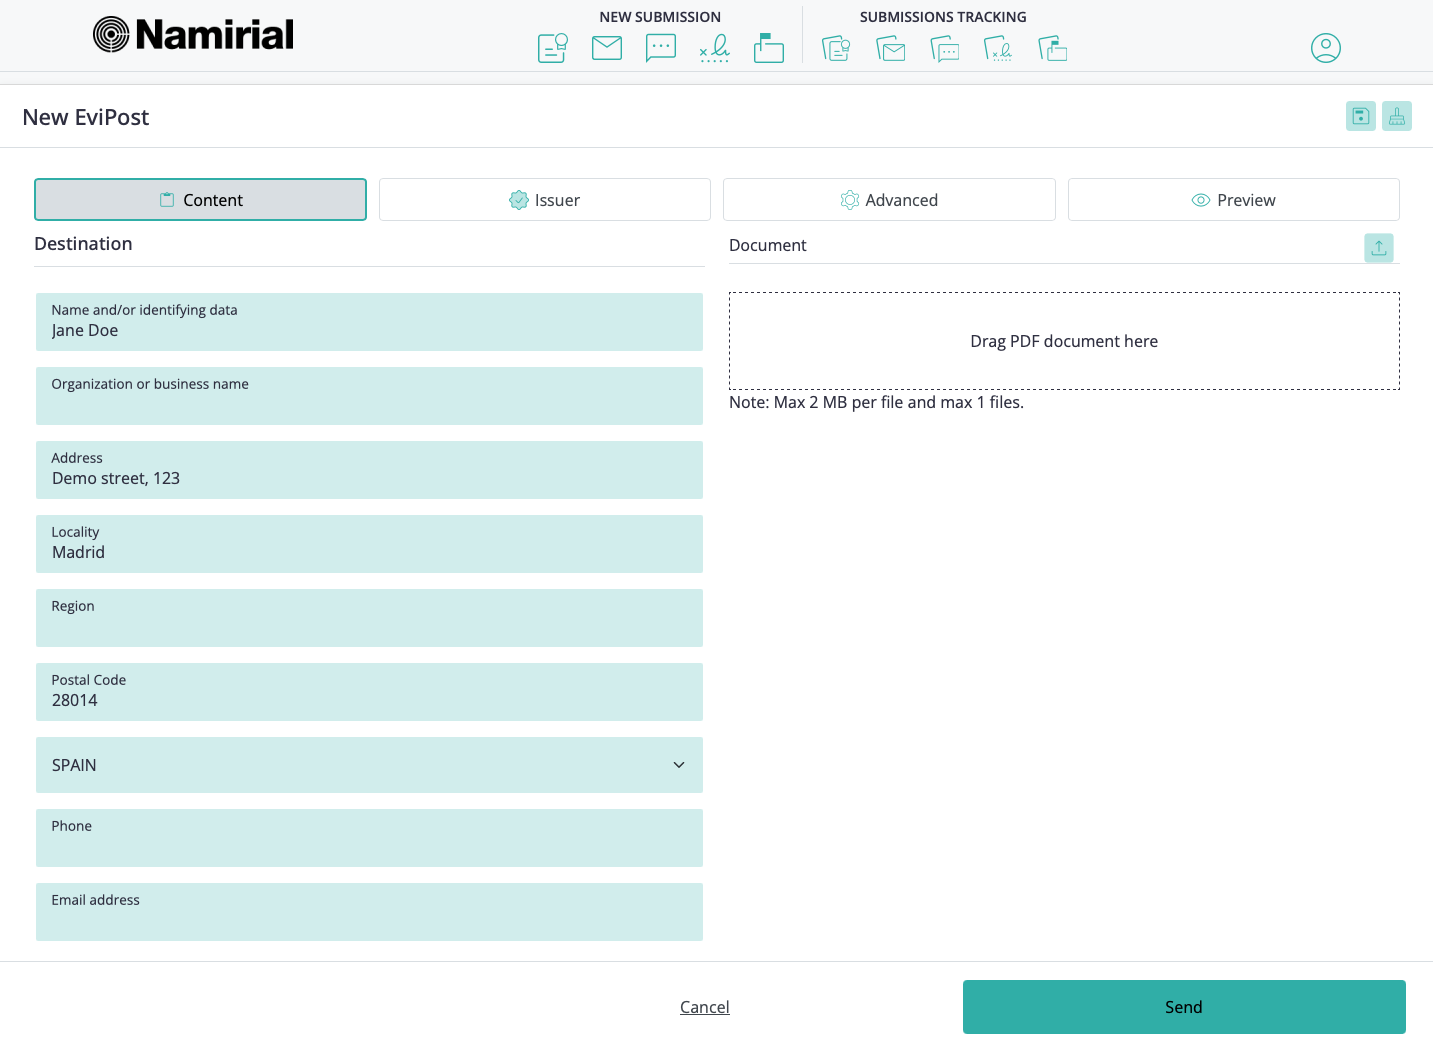
Key fields in this section:
Name and/or identifying datashould identify the recipient as clearly as possible.- Postal address fields should be complete and consistent with the destination country.
- Attach one PDF smaller than 2 MB (2,097,152 bytes). The document-size limit is fixed; it is not an account setting.
- Enter the sender name in
Name and/or identifying data. - Enter
Organization or business namewhen applicable. - Enter the issuer
Address. - Enter the
Locality. - Enter the
Region. - Enter the
Postal Code. - Select the issuer country.
- Enter the issuer
Phoneif needed. - Enter the issuer
Email addressif needed. - Use the text area under
Additional user's comments associated with the eventif your process requires extra notes.
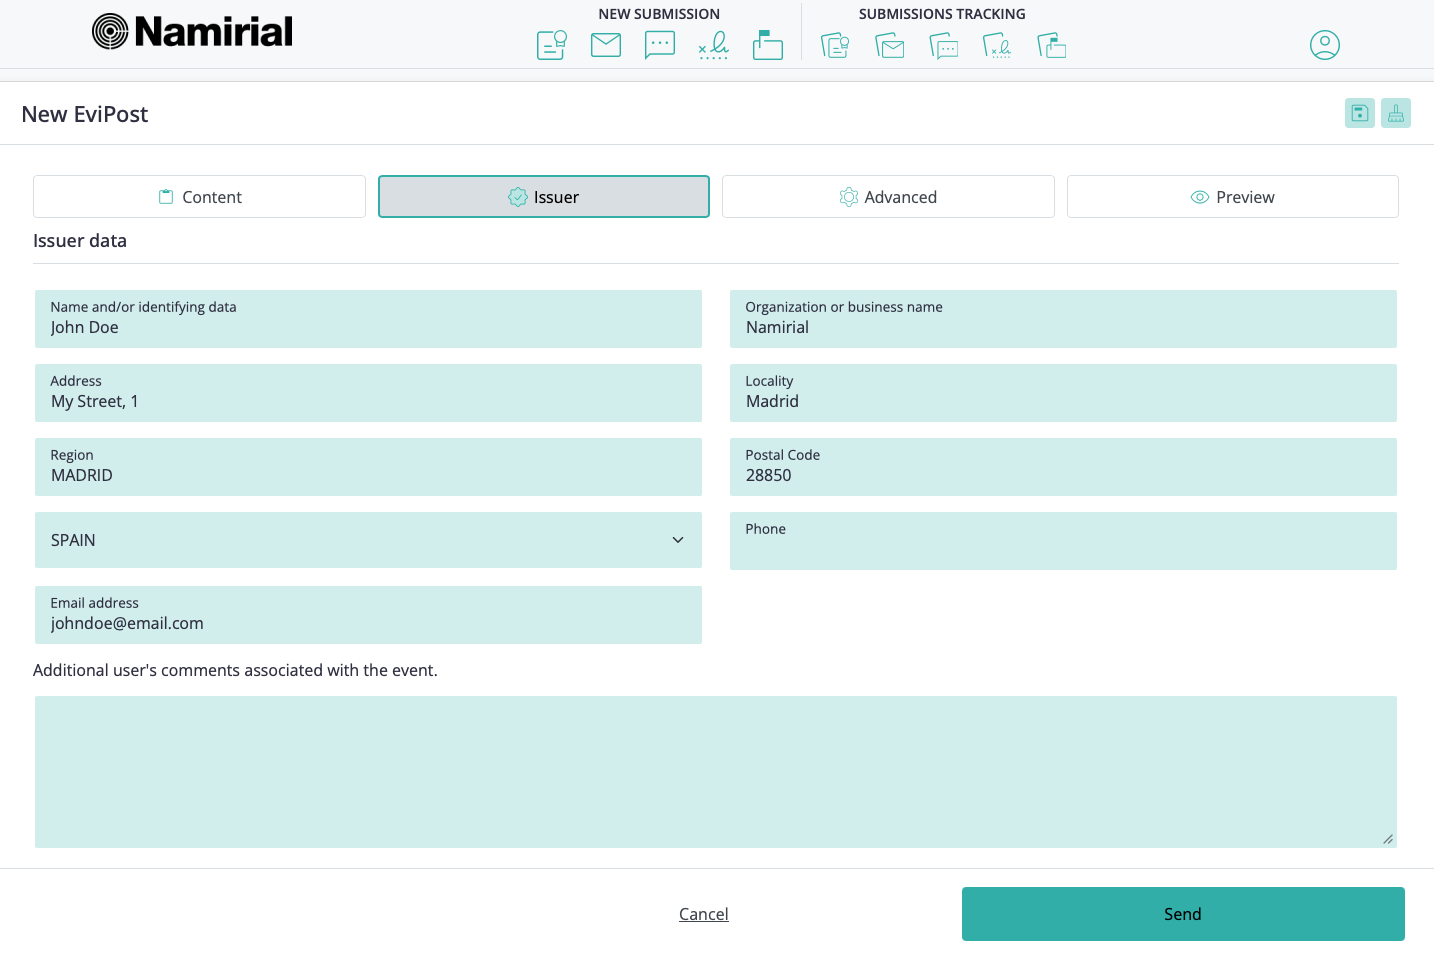
Key fields in this section:
- Issuer data identifies the sender in the postal process and related evidence.
- The comments area under
Additional user's comments associated with the eventcan be used for internal or process-specific contextual information.
Under Profile service, the service options correspond to these service types:
| Web app name | Service type used in the API and lifecycle reference |
|---|---|
| Certified delivery | Registered |
| Certified delivery with destruction | Letter |
| Basic certified delivery | LetterLite |
The form preselects the service type configured for your site. Review that selection before sending. The service selector chooses the postal service; the API's PostServiceProfile is a separate provider-profile setting.
- Under Profile service, select the type of service.
- Select the
Certification and security level. - Select the
Affidavits Profile. - Enter
Internal referenceinAdditional dataif your process uses it. - Select the
Notification language. - Decide whether to enable
LTA Custody. - If you enable
Notarial deposit, select a notary profile. Availability depends on your tenant and territory. - Set the
Retention period. - Select the
Custody access controlmethod. For challenge-based access, enter both the challenge and its expected response. - Select the
Cost Centre. - If you need updates sent to an external application, configure Push Notifications with both a callback URL and at least one event filter. Leave both unset when you only need to track the communication in the Web app.
Your application must handle these notifications as described in Callbacks and webhooks, whether the communication was submitted from the Web app or the API.
Key fields in this section:
- The selection under Profile service defines the postal workflow used for the shipment. See the name mapping above and EviPost service types.
Certification and security levelandAffidavits Profiledefine how the shipment evidence is certified.Internal referencestores an internal identifier for later tracking.Notification languagecontrols the language used in recipient-facing notifications where applicable.LTA Custody,Retention period,Custody access control, andNotarial depositaffect long-term preservation and access to evidence.Cost Centresupports internal allocation when your organization uses it.
For more detail on generated evidence and affidavit kinds, see Evidence and affidavits. For retention, custody, and LTA concepts, see Archiving and retention.
- Open Preview and review the recipient address, issuer data, attached PDF, and selected options.
- Confirm that the selected service type, certification, and custody settings are correct.
- Click Send.
Namirial Notify creates the EviPost and submits it for postal processing according to the selected configuration. Use EviPost transaction search to locate it, open its history, and retrieve the available evidence and affidavits. Postal updates can take days or weeks; a successful submission does not confirm physical delivery.
Problem: The form does not accept the destination data or the address appears incomplete.
Cause: One or more required postal fields may be missing, inconsistent, or invalid for the selected country.
Solution:
- Confirm that the destination name and postal address are complete.
- Confirm that
Locality,Region,Postal Code, and the selected country are correct. - Review the recipient phone and email fields if your process requires them.
Problem: The file cannot be uploaded or accepted in the form.
Cause: The file may not be a valid PDF, or its size may reach or exceed the fixed 2 MB document limit.
Solution:
- Confirm that the document is a valid PDF smaller than 2 MB (2,097,152 bytes).
- Review any validation message shown during upload.
- Replace the file and try again if the current document does not meet the allowed limits.
Problem: A service type or advanced option described in this guide does not appear in your EviPost form.
Cause: The option may depend on tenant configuration, territory, or user role.
Solution:
- Confirm whether the feature is enabled for your tenant or role.
- Check whether the selected service type or advanced option is supported in your environment.
- Contact your administrator or sales contact if you need the option enabled.